Introduction to PhotoStrata
PhotoStrata is an advanced image editing tool created to help you make fine-tuned edits and adjustments to your images that are otherwise not possible in traditional image editors.
Traditional editing flattens your image. PhotoStrata decomposes your image into 'Frequencies' — separating texture from shape. This allows you to apply separate adjustments to each scale of frequencies, resulting in an overall better result.
Applying smoothing to very fine textures often allows you to suppress noise without affecting sharp details. Applying color corrections or contrast adjustments to coarse layers allow you to achieve these without adding color noise to the very fine layers.
1. What makes PhotoStrata different?
When you open any image in PhotoStrata, our advanced algorithms decompose your image into multiple layers based on the size of detail.
For example, imagine your image is a physical terrain map.
- Scale 1 (Smallest): The pebbles, grains of sand, and sharp jagged rocks. In an image, this is where the noise and very sharp details would exist.
- Scale 2–4 (Medium): The boulders and trees. In an image, this is where sharp edges and lines amongst other fine details would exist.
- Scale 5+ (Large): The hills and mountains. In an image, this scale would represent the overall shape and structure of the landscape.
- Residual (Infinite Scale): The curvature of the earth. In an image, this scale contains very broad shapes and colors.
The app then allows you to make adjustments, either directly or through masking, to e ach of these layers individually. This allows you to modify the fine details and structures separately from overall shapes and colors. Ultimately, you end up being able to make targeted adjustments without affecting the non-intended parts of the image.
2. Why are layers generated automatically?
Imagine your photograph is a piece of music. Standard Editing (Brightness/Contrast) is like the Volume Knob. If you turn it up, everything gets louder—the drums, the vocals, and the background hiss.
PhotoStrata's Layers are like a Graphic Equalizer.
- High Treble: The tiny details (Noise, Grain).
- Mid-Tones: The medium details (Stars, Craters).
- Deep Bass: The large structures (Nebulae, Background gradients).
PhotoStrata automatically splits your image into these "musical frequencies" (Scales) so you can turn down the "hiss" (Noise) without turning down the "vocals" (Stars).
In traditional editing, pixels are just pixels. The software doesn't know the difference between a white pixel in a star and a white pixel in a nebula. PhotoStrata's layers provide Structural Awareness.
3. How do I use these layers?
The following three use cases give you an overview of how you can use the layers in PhotoStrata for your own edits.
Surgical Denoising (The "Small" Layers)
The Problem
In normal apps, "Noise Reduction" blurs the whole image. It kills the noise, but it also kills the sharp edges of your subject.
The PhotoStrata Way
Noise almost always lives in Layer 1 (The finest scale). You can delete or blur Layer 1 entirely.
Star Reduction (The "Medium" Layers)
The Problem
You want to shrink the stars so the nebula stands out. In normal apps, you have to spend hours drawing manual selection masks around every single star.
The PhotoStrata Way
Stars usually live in Layers 2 and 3. You can simply lower the bias/intensity of Layer 2.
Local Contrast (The "Large" Layers)
The Problem
You want to make the nebula look "punchy" and dramatic. Increasing global contrast usually blows out the stars (makes them pure white circles).
The PhotoStrata Way
You boost the contrast only on Layers 4 and 5.
The Main View
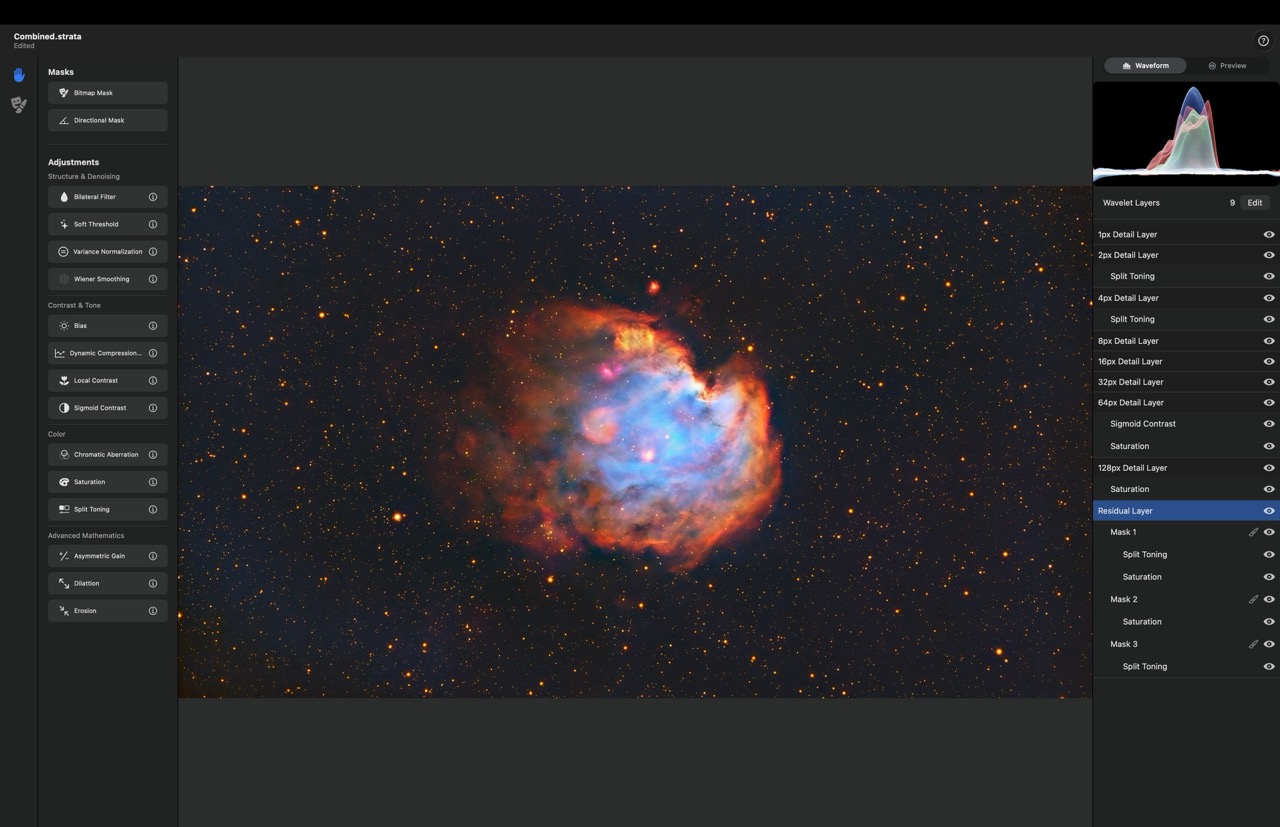
The main view consists of three key areas:
- The left sidebar where you can find adjustments and masking options
- The canvas view in the middle that shows the image being edited.
- The right sidebar that allows managing layers and edits, as well as shows previews for the selected layer.
The most interesting bit is the right sidebar, let's look at it first.
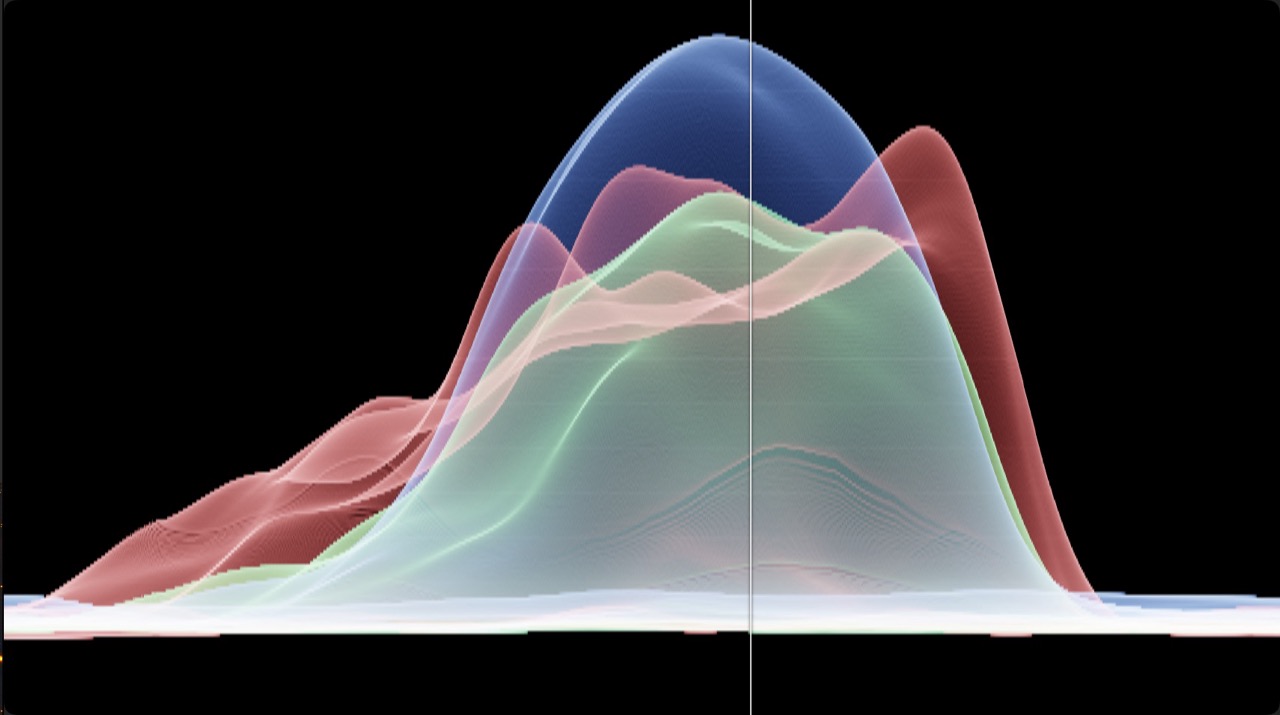
Waveform Scope
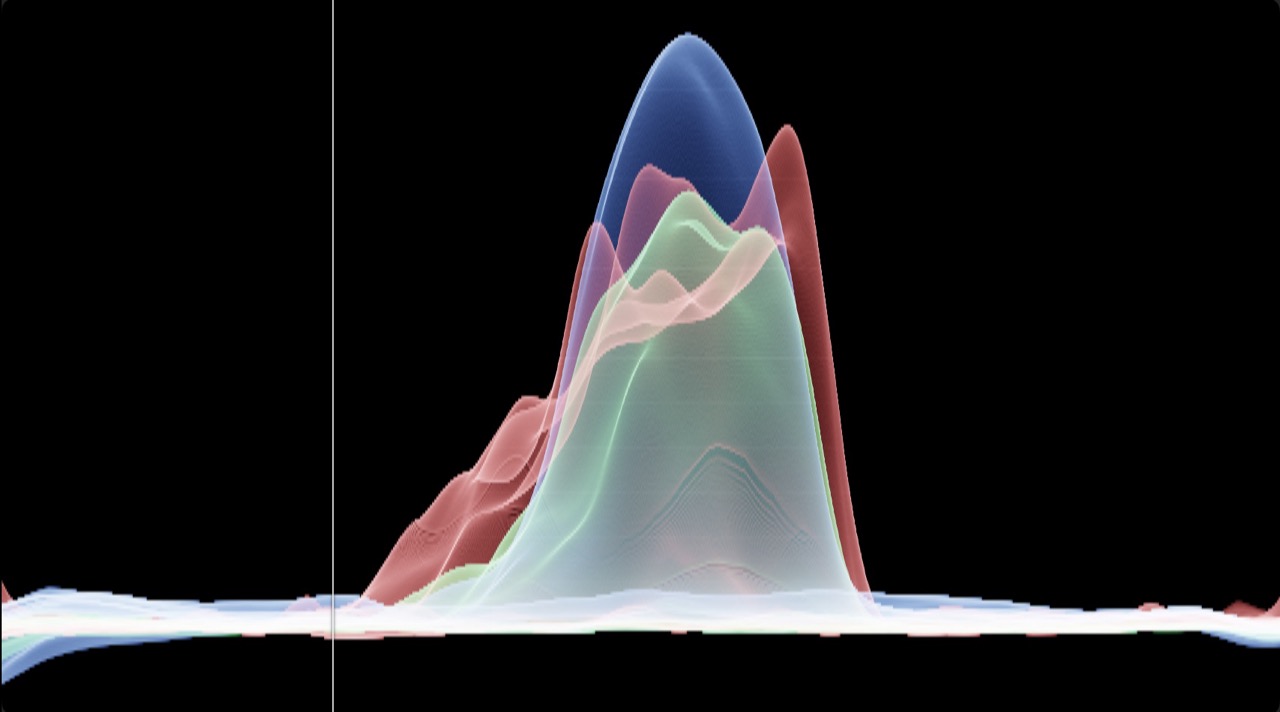
Unlike a standard Histogram, which jumbles all pixels together into one pile, the Waveform preserves the Left-to-Right structure of your image.
- The X-Axis (Width): Corresponds exactly to the width of your image. The left side of the graph shows the left side of your photo; the right side shows the right.
- The Buckets (Columns): Imagine slicing your image into 256 vertical strips (buckets). The scope looks at every pixel in that vertical strip and plots its brightness on the graph.
- The Y-Axis (Height): Represents brightness. Stars appear as high peaks; the dark sky background appears as a "floor" near the bottom.
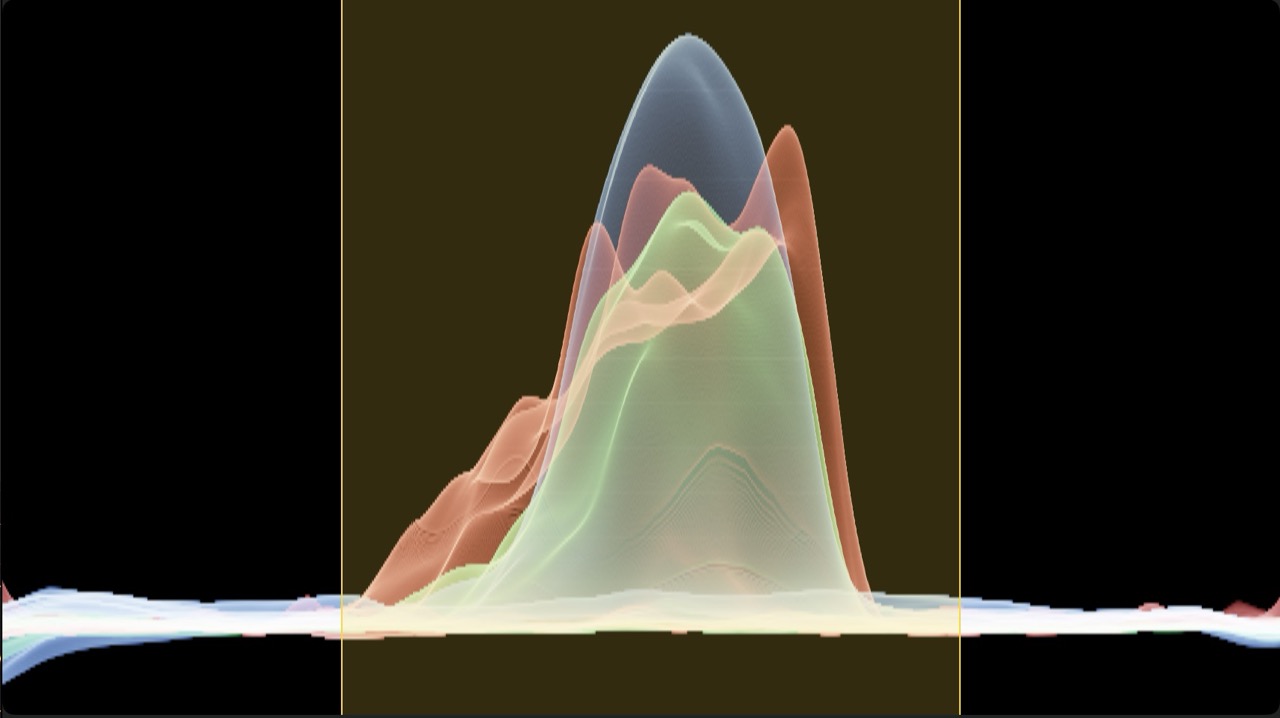
Interacting With The Waveform
This view allows you to zoom in further to view specific parts of the image in more detail. To do so, just drag across the waveform to zoom in on the dragged area.
Layer Previews
There are four different layer preview modes to help you visualize even the finest of adjustments that you make. You can access them by selecting a layer and then clicking preview at the top of right panel.
Magnitude Preview
This mode visualizes the image using a logarithmic scale (similar to the astronomical Magnitude scale). It compresses the brightness range, allowing you to see even minor differences in brightness and detail.
Threshold Preview
This mode converts the image into pure Black and White to allow you to visualize edges and troughs better.
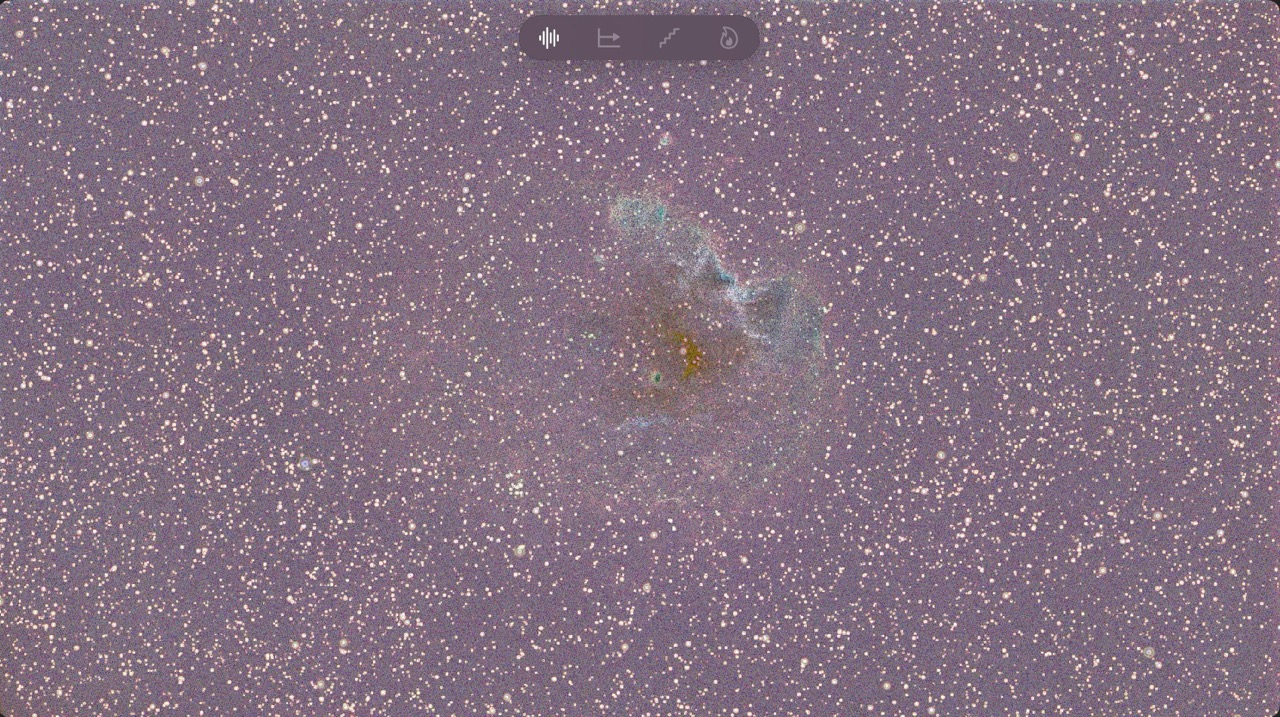
Gray Offset Preview
This mode lifts the black point to a middle gray and aggressively stretches the contrast of the darkest pixels. It effectively "over-exposes" the background noise while ignoring the bright elements.
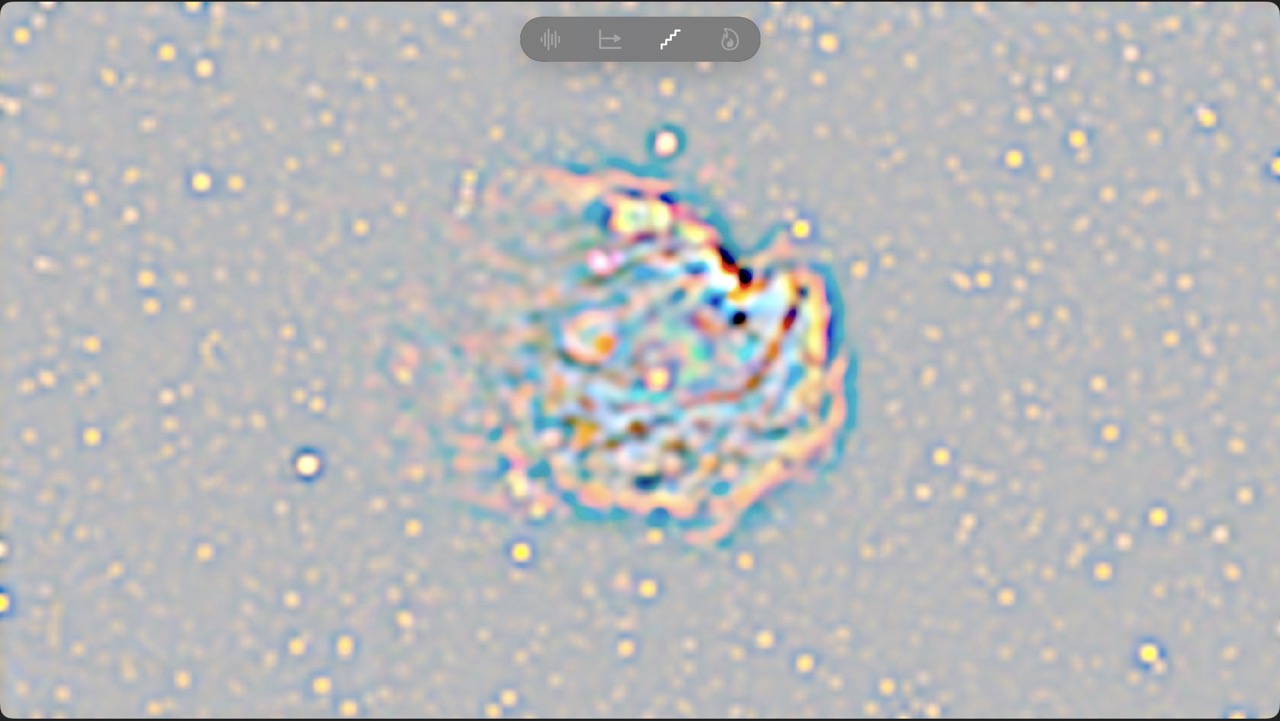
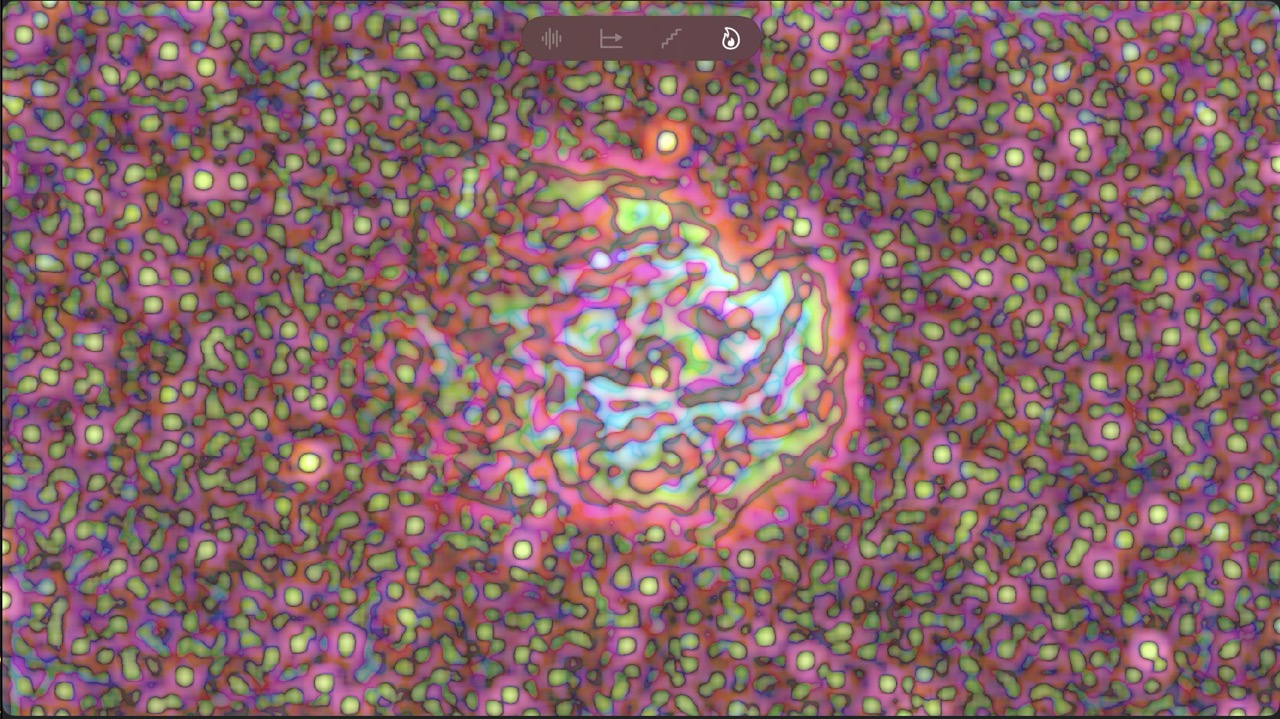
Heatmap Preview
This mode replaces the image's natural color with a "False Color" thermal map. Deep blacks are Blue, faint signals are Green, and bright objects are Red/White.